Exporting clean heightmaps from QGIS: Redux
Back in the first post of this blog I showed a way to export heightmaps from QGIS as 16-bit pngs with a plugin.
Today's post is about another approach, allowing exports as 32-bit tiffs. The process might be a bit different on more up-to-date versions of QGIS. I'm currently using 3.24. We'll need to install some extra packages so let's move on.
First, from the top bar menu go to Plugins>Manage and Install plugins and search for SAGA. Enable the "Processing Saga NextGen Provider" box. If you do not see it, go to Settings in the same window and enable "Show also experimental plugins". As I'm writing this it does not seem to be experimental anymore but who knows.
Disable the old SAGA toolset if this ticked.
If you haven't installed yet, you'll see "Requires manual installation of SAGA <VERSION> binaries." in the plugin description after clicking the checkbox, so that's what we'll be doing next. You can dismiss the plugin window now.
Open your favorite browser and go to https://saga-gis.sourceforge.io/en/index.html and on the left column, under the Source Forge Section, click "Downloads".
That will bring you to a SourceForge page. Now you'll have to choose folder with the same version number as showed in your QGIS plugin window, if you want to be on the safer side, or get the latest release.
There are many options here, but for a regular Windows 64-bit you'll want to click on the link that has the following description:
- 'saga_<version>_x64.zip': binaries for MS-Windows (64bit), just unzip and run!
After the download finishes, unzip it and place the folder with all the contents somewhere easy to remember in your computer.
Back in QGIS, on the right toolbar(Processing Toolbox), click the wrench.
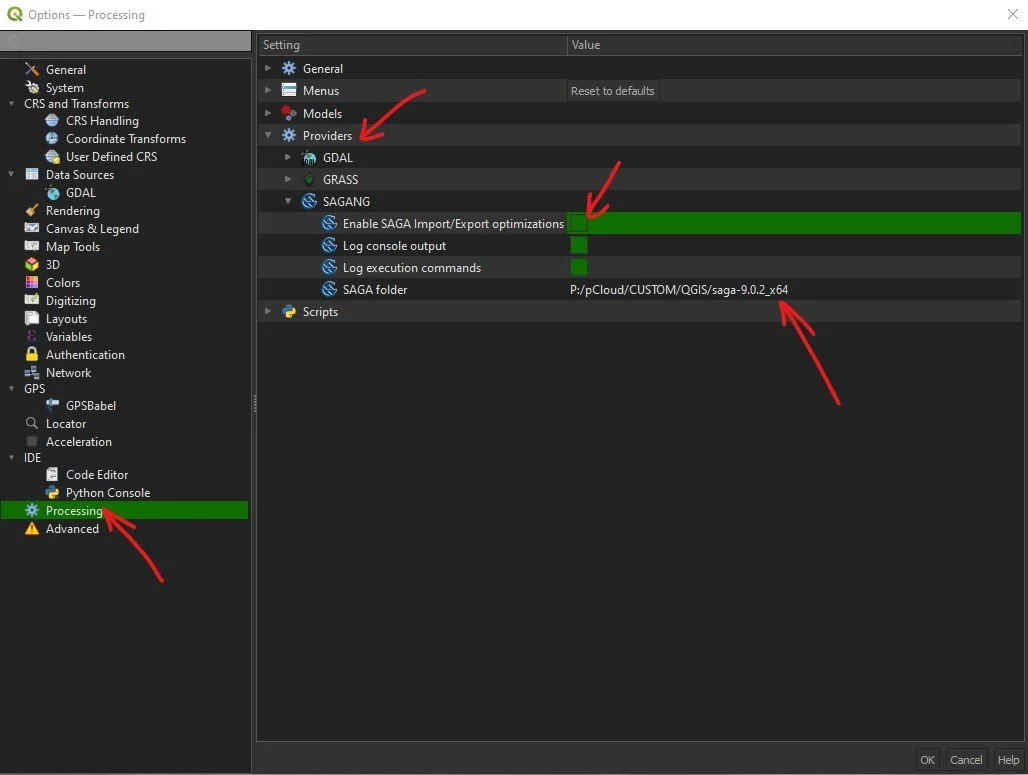
Under the "Providers" you'll see SAGANG section now, as you enabled the plugin checkbox before(If it doesn't show up, try restarting the program). Expand that section, check the "Enable SAGA Import/Export optimizations" and in "SAGA folder" Point to the top level folder you extracted before.
Now you'll see the SAGA Next Gen on the bottom of the processing toolbox, with the necessary goodies for exports! This concludes the install part, now for the actual export steps.
First, we need to normalize the height values from the current range to 0-1.
On the Processing Toolbox, under the new SAGA Next Gen section, look for "Raster calculus" sub-section and right click on the "Grid normalization" and click "Execute...". You can also search "norm" on the top of the Processing Toolbar. It will show up under the SAGA Next Gen category, so you'll know its the correct one.
This window you'll point to the raster(heightmap image) that you imported previously.(If you haven't yet, from the top menu: Layer>Add Layer>Add Raster Layer and select the image from your computer). You have the option to save the normalized image as a temporary file. Since there's a few more steps before getting the 32-bit tiff yet, it's up to you if you want to keep it or regenerate it again when you close QGIS. Either way, click Run.
After the process is finished(can take a while depending on the image resolution), you'll see under the Layer panel on the bottom left of QGIS window the normalized heightmap, on top of your original image.
The heightmap has been normalized.
Then, search for "translate" in the processing toolbox, and you'll find a "Translate(convert format)" under the GDAL toolset. Right click it and press "Execute...".
In this window you'll choose the layer you want to export and the path to save, including the format. In my uses so far tif works great.
The most important thing in this window is set the command line parameters "-r bilinear"(without quotes). Otherwise the conversion process will use Nearest Neighbor Filtering which will look bad for heightmaps.
Press "Run" and that's it! You'll have a 32-bit normalized heightmap hot off the press. But keep the original heightmap file around, you might need to use the original values when remapping the range in another application.
The png plugin also took care of the image dimensions for you in relation to the size in meters, but with this approach you have to be mindful of the values yourself. But depending on your sources, a 32-bit starting point gives much better fidelity than 16-bit.
Not sure when I'll make another post about QGIS since it has very sparse use in my workflow. but then again, this process is now documented here for my future use as well.
See you next mission.


